")
basic-editing-1
for this assignment follow the intructions: attached instructions and the lesson .Once you are confident in how to use these editing tools please complete this assignment by sending it to me as an attachment in this lesson. The name of the file should include lesson number 2 and your name.
Practice with this passage taken from this lesson for this assignment:
“Whenever you copy anything in MS Word, it is automatically sent to the Clipboard. The Clipboard does just as its name implies. It holds the text that you copy and paste for you to use. The Clipboard and its associated tools can be found on the Home tab at the far left end of the ribbon. Click the arrow at the bottom of the Clipboard group to see its contents. The clipboard will open as a long window to the left of your document. It can only hold 24 objects. When a 25th object is added, the first copied item is removed. To empty the Clipboard, click the Clear All button at the top of the Clipboard menu. “
Copy/paste the above text in your MS Word and practice using these editing tools:
Practice selecting text, select all, cut and copy, paste, use the clipboard menu, insert text, use the navigation pane, find and replace text, and use auto correct.
Once you are confident in how to use these editing tools please complete this assignment by sending it to me as an attachment in this lesson. The name of the file should include lesson number 2 and your name.
Lesson 2: Basic Editing
Selecting Text
The first step in editing text that you’ve already entered is to learn how to select it for editing. Whenever you select text in Word, the text appears highlighted, as shown below.

Selecting text is easy and done in three easy steps.
1.Move the cursor to the beginning of the text that you want to select.
2.Click and hold in the left button on your mouse.
3.Drag it over the text you want to select. It will highlight the selected text in blue. Simply release the mouse button when you are finished selecting text.

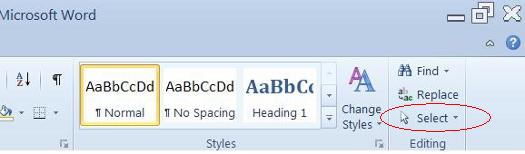
If you want to select the entire document, simply click on the Home tab and click Select on the far right (located below ‘find’ and ‘replace) as seen in the picture below. You will then select ‘select all.” This will highlight all your text for formatting. Also note that you can select objects or text with similar formatting as your selected text when clicking on ‘Select.’

Here’s a zoom of the Home tab, left side

And here’s a zoom of the Home tab right side

To be more exact, here’s a zoom in to help you find ‘Select.’
Cut and Copy
Once you’ve selected text, there are several things that you can do with it. Naturally, you can select text to format it. Perhaps you want to change the font type or size. You can also cut selected text from a document as a way to either delete it or paste it elsewhere in the same or another document. Or you can copy it, then paste it elsewhere. We’ll show you how to do all of this.
If you’d like to delete text or objects from one position in the document to Paste into another position, use the Cut command:
1.Select the text or object to be cut and copied and click the Cut icon  in the Clipboard group.
2.Select the text or object to be cut and copied, move the mouse pointer over it and click the right mouse button. Select Cut from the menu.
3.Select text or object to be cut and copied and use CTRL + X.
Delete and Cut should not be used interchangeably. When you Cut an object, it is copied to the Clipboard. When you Delete an object, it is simply removed from the document and the only way to restore it is by clicking the Undo Typing button.
There are three ways to copy text and objects to the clipboard.
1.Select the text or object to be copied and click the copy icon  in the Clipboard group.
2.Select the text or object to be copied, position the mouse pointer over it and right click. Then select Copy from the menu.
3.Select text or object to be copied and hit CTRL + C.
The Clipboard
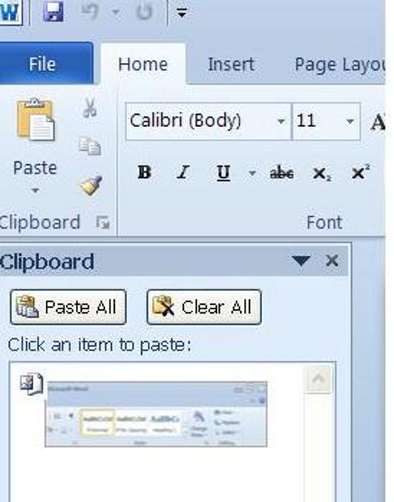
Whenever you copy anything in MS Word, it is automatically sent to the Clipboard. The Clipboard does just as its name implies. It holds the text that you copy and paste for you to use. The Clipboard and its associated tools can be found on the Home tab at the far left end of the ribbon. The Clipboard group looks like this:

Click the arrow at the bottom of the Clipboard group to see its contents. The clipboard will open as a long window to the left of your document. It can only hold 24 objects. When a 25th object is added, the first copied item is removed. To empty the Clipboard, click the Clear All button at the top of the Clipboard menu.
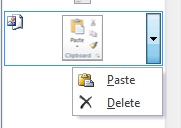
You can remove individual items from the clipboard by moving the mouse pointer over the item and clicking the arrow button that appears to the right of the object. In the drop down menu, select Delete.
Paste
The Paste command allows you to copy an object from one location in the document to another, or from another MS Office Program into MS Word 2010. You can use the Cut or Copy feature to move an item to the clipboard, then use Paste to place it elsewhere into a document.
There are three ways to Paste text or an object into a document:
1.Move the cursor to the point in your document where you want to place the item and click the Pasteicon  .
.
2.Move the mouse pointer to the place you wish to insert the item and click the right mouse button. Select Paste Options from the menu. We’ll discuss the options in just a minute.
3.Move the cursor to the point in your document where you wish to place the item and press CTRL + V.
Ordinarily, MS Word pastes the most recently copied item. To paste an object that was copied earlier, position the cursor at the point in your document you wish to paste the item, then open the clipboard and click the item you wish to paste. You can also move the mouse pointer over the item to be pasted, and click the arrow that appears to the right of that item. Then select Paste Options.
Paste Options is what you see when you right click your mouse to paste into a document. It’s the method of pasting that you should use if it’s important for you to keep or remove formatting for the selected text.
Let’s explain what we mean. This course is typed using the Verdana font. Let’s say for example, that we want to paste a paragraph of this lesson into another lesson with a different font size, or into another document with a different font. MS Word 2010 gives us the option of preserving formatting, making the formatting match the area of the document where we paste our text, or pasting text only and not any images that we cut or copied.
Again, Paste Options only appears when you right click your mouse to paste. Once you’ve copied or cut selected text, then right click, you’ll see this:

 Paste using original formatting of pasted text.
 Paste using the formatting of the majority of the text in the document.
 Allows you paste text only. Any graphics or images will not be pasted, only text.
 Paste using the formatting of the destination text, or the text where you paste into.
Inserting Text
You can insert text anywhere in a document simply by moving the cursor to the desired location and typing.
Word automatically moves all text to the right of the cursor over as you type. If, however, you’d rather replace the text as you type, Word 2010 gives you two options:
1.Select the text you’d like to replace and start typing. This deletes the highlighted text and positions the cursor in its place.
2.Use Overtype Mode. To turn on overtype mode, click on the File tab, then select Word Options.
3.Next, select Advanced.

4.Check “Use the Insert key to control overtype mode” or the “Use overtype mode” box.

If you select the “Use the Insert key to control overtype mode” box, you can toggle overtype mode on or off by pressing the Insert key. If you select only “Use overtype mode” you must manually turn it off by deselecting it.
The Navigation Pane
The Navigation Pane is a new feature in MS Word 2010. The Navigation Pane does away with having to scroll through paragraphs and paragraphs of text to copy and paste sections manually. Instead, you can navigate through the document easily and use drag and drop to move the sections you want to move.
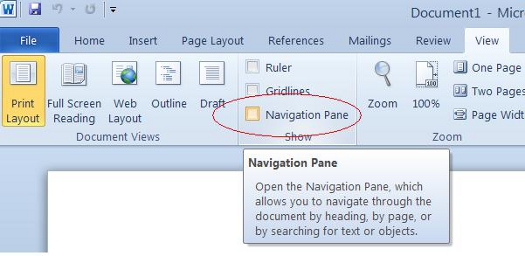
You can’t see the Navigation Pane when you have MS Word 2010 open. It’s hidden by default. To see it, click the View tab on the ribbon, then check the box beside Navigation Pane.

Here is a zoom of the location of the Navigation pane
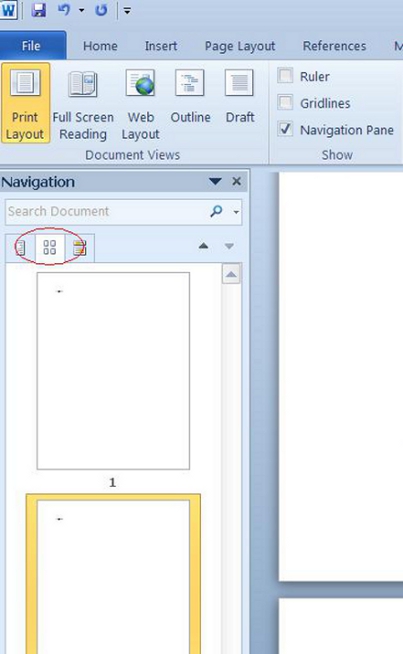
The Navigation Pane will then open on the left side of your screen, as shown below.

Toward the top of the Navigation pane, you’ll see three tabs with icons on them.

The first tab (from left to right) allows you to browse headings in your document(as shown in the former snapshot above). The second tab allows you to browse your document by page.
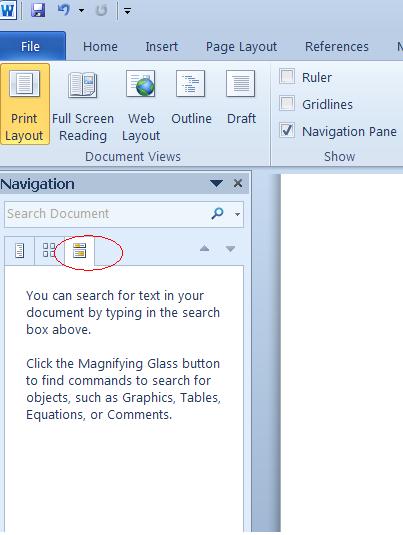
The third allows you to search for text in the document by using the search box at the top of the Navigation Pane.
Using the Navigation Pane, finding text within your document becomes a lot easier than in previous versions of Word. Let’s say you want to move Lesson 2 so it comes before Lesson 1 (we’re using the snapshots above). We’d simply click on the Headings tab, then drag and drop Lesson 2 in the navigation pane up and above Lesson 1. MS Word 2010 would move the entire lesson for us.
You can also right click on any heading and either promote it or demote it. (A heading is a style you can give to text. Headings are often used when you want to create chapters or sections within a document, and a requirement if you want to create a Table of Contents. We’ll learn all about headings later in this course). To promote or demote a heading, right click on the heading in the Navigation Pane, then select promote or demote. Perhaps, for example, you want to make a section title a chapter title instead. To do that, you’d promote it.
Find and Replace
Find and Replace can also be used to edit words or sections of a document. If you want to find a certain word or phrase within your document, instead of scrolling through it, you can go to the Home tab, then click Find on the far right.

You’ll then see the Navigation Pane open on the left with all instances highlighted under the Headings and Pages tabs. Under the Search tab, you’ll see sections of text that contain your word and phrase.
You can also replace words or parts of texts by using the Replace feature. To use this, click Replace (right under Find).
You’ll then see this window: By clicking More we were able to obtain even more options.
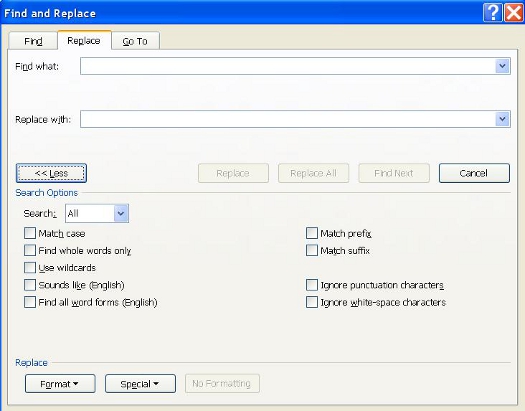
(Please note: you can also use Find using this window. If you’re used to previous versions of Word, you can simply click Replace to use Find as you had in prior versions.)
Next, type in the word or phrase you’re looking for in the Find What box. This is the word or phrase that you want to replace.
Now, type in the new word or phrase that you want to insert into your document instead in the Replace With box.
When you’re finished, either click on Find Next to find the next instance of the words or phrase you want to replace, then click Replace. This gives you the power to make sure only the changes you want made are made. Or click Replace All to have MS Word 2010 make all replacements for you at once.
Auto Correct
AutoCorrect automatically corrects some errors you make. For example, by default, MS Word will start the first letter of every new paragraph with a capital letter. It also may recognize certain words and make corrections for you without ever having to use Spell Check. However, you can customize AutoCorrect to find certain errors or to leave certain “errors” that you make alone.
To customize Auto Correct, click on the File tab, then click Options on the left. Click on Proofing on the left.
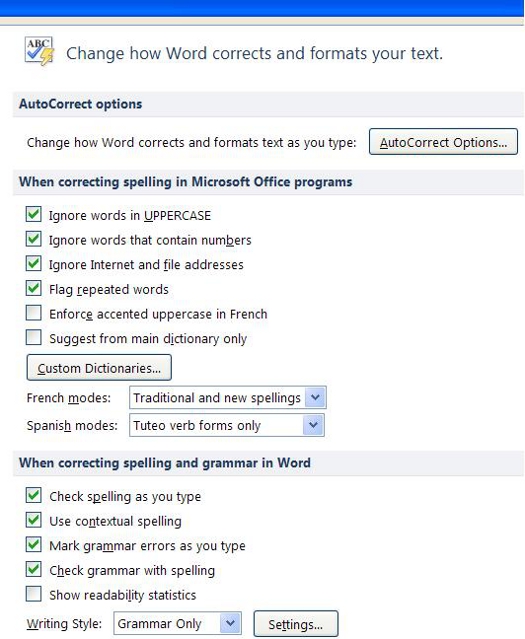
Then click the AutoCorrect Options button. The screen you will see will look like the one below.
Click on the AutoCorrect options button, and you can specify words or even math that you want MS Word to correct as you type.
Undo and Redo
But let’s say you accidently delete something or deleted it and then decided that you want it back. You grit your teeth and start to grumble, trying to remember the exact wording. It’s a lost cause, right? Wrong. The makers of Word anticipated this problem and supplied an easy solution. The Undo button! 
The Undo button can be found in the upper left corner of the program window in what Microsoft calls the “Quick Access Toolbar” (You’ll learn how to add your own most commonly used commands to the Quick Access Toolbar in a later lesson.) The Undo button is the blue arrow shaped like a comma. If you are not sure you’ve got the right button, you can move your mouse over it and wait and a small box that reads “Undo (Ctrl-z)” will appear. Word allows you to undo up to 100 actions.
The Redo button is to the right of the Undo button.  It looks like the recycle symbol you might see on trashcans at the airport. The redo button allows you redo an action that you just undid or to repeat the last action. If Word cannot redo the last action, the button will be faded.
Hyphenation
MS Word 2010 can hyphenate words at the end of lines for you, or you can choose to do it yourself. By default, hyphenation is turned off, which means MS Word won’t hyphenate words that are at the end of a line. Instead, it will just move the word to the next line.
To use the hyphenation feature in MS Word 2010, click on the Page Layout tab, then go to the Page Setup group on the ribbon. You’ll see Hyphenation, as shown below.

If you click the downward arrow beside Hyphenation, you’ll see that None is selected. This means no hyphenation (default.) If you want Word to hyphenate words for you, select Automatic. This means that MS Word 2010 will hyphenate words that appear at the end of a line rather than moving it down to the next line to keep your text within the margins. MS Word will use its settings to decide how to hyphenate words. Just keep in mind, it does NOT mean Word will hyphenate words such as ‘how-to.’ It won’t.
You can also select Manual. This box will pop up and ask you to specify how you want words hyphenated. Word will search your text for words that can be hyphenated and ask you how you wanted hyphenated. See the snapshot below:
You can also set options to tell Word the maximum amount of space to allow between the word and the right margin. This is called the Hyphenation Zone. To set the amount of space yourself, go to Hyphenation, click the downward arrow, then click on Hyphenation Options. In this window, you can also select to automatically hyphenate the entire document, hyphenate words that are in CAPS, and manually set hyphens as we just learned to do.